Instructions for completing billing-related tasks
- 1098T Form – Students View & Download
- 1098T Form – Parents/Others View & Download
- Access to CUBill&Pay – Authorize Payers
- Authorize Financial Aid to Pay All Charges
- Bill – View Bill Details Online
- Bill Payment – International (Using Flywire)
- Bill Payment – Online (from U.S. Bank Account or Credit/Debit Card)
- College Opportunity Fund – Apply & Authorize
- Confirmation Deposit (Returning Students)
- Direct Deposit for Tuition & Fee Refunds
- Health Insurance – Select or Waive
- IdentiKey Activation
- Payment Plan – Enroll
- Payment Plan – Rebalance
- Payment Profiles – Edit
- Write a Check
Instructions for students:
- Students log in to Buff Portal.
- Enter “1098t” in the “Search Buff Portal” field on the left and click 1098-T Tax Form to open the card.
- Click "View/download 1098-T."
- Select the year of the form you want to view and/or download.
- Select "1098-T Form" (to download the form) or "Transaction Detail" (for detailed information) and click "View."
- Click "Allow" to allow the site to download the form.
- Print or save the form.
- If you select "Transaction Detail," you can view a breakdown of payments received for qualified tuition and expenses, prior year adjustments, grants and scholarships, and prior year grant adjustments. Visit 1098-T Boxes Explained and FAQs for more information.
Step-by-Step Instructions to View 1098T
Parents, family members or others can get the 1098T form one of two ways: 1) ask their student(s) to download the form and send it to them; or 2) they can ask their student(s) to give them access to the 1098T form within CU Guest Access so they can download the form themselves. Forms are not mailed. See Students: How to Set Up CU Guest Access. (This access is different from authorized payer access.) Once you have access to the 1098T form within CU Guest Access:
- Log in to CU Guest Access.
- Click on "CU View 1098T."
- Enter student’s first name.
- Select the year of the form you want to view and/or download, then select "1098-T Form" and click "View." (You may need to disable the pop-up blocker on your browser.)
If you have questions about CU Guest Access or need help troubleshooting your access, please contact the Office of the Registrar at registrar@colorado.edu.
Parents, guardians and other family members do not automatically have access to view their student’s account (learn more about getting the bill vs. footing the bill). Students can give up to five people access by authorizing them as payers to view the account and pay online. This access is separate from CU Guest Access and the FERPA Consent to Release.
- Students log in to Buff Portal (buffportal.colorado.edu)
- Locate the Tuition & Fees card. It will be on the main Buff Portal page. Then click "Account Setup."
- Click "Authorize Payers."
- Enter your authorized payer’s name and email address. Then create a login name for them. Click "Save."
- An email with the login name will be sent to the authorized payer’s email address that you entered. They will then be prompted to set a password. You can add up to five authorized payers (click Add New). You can delete them at any time. They will be notified by email when their status changes.
Please see Apply aid to All University Charges for instructions.
Bills are online only.
- Students log in to Buff Portal (buffportal.colorado.edu.) (Authorized payers log in to CUBill&Pay, select "View & Pay Accounts" and go to step 4 below.)
- Locate the Tuition & Fees card. It will be on the main Buff Portal page. Then click "Balance Summary."
- On the Balance Summary view, you can see your current balance. To see the bill, click "View/Pay Bill."
- You will see options for main campus (CU Boulder Tuition and Fees) and Continuing Education. Click "View Account Details" for the bill you want to view.
- At the top of the page, you will see general information.
- Scroll down to view details.
- Account Detail shows Charges and Adjustments in the top section and Credits and Payments below.
- The Current Balance includes recent activity and is the difference between the charges and credits.
- This view shows all transactions since your last bill date.
- Bill History shows previous bills.
- If you need to print the bill, scroll up and click Print.
- If you would like to pay the bill, click Make a Payment.
- Students log in to Buff Portal (buffportal.colorado.edu.) (Authorized payers log in to CUBill&Pay, select "View & Pay Accounts" and go to step 4 below.)
- Locate the Tuition & Fees card. It will be on the main Buff Portal page. Then click "Balance Summary."
- On the Balance Summary view, you can see your current balance. To see the bill, click "View/Pay Bill."
- You will see options for CU Boulder Tuition and Fees (Main Campus) and Continuing Education. Click the pay button for the campus you wish to pay. Pay each campus separately.
- Enter payment amount and select "International Student Payment" and "Continue."
- Review the information and click "Continue."
- Select the country or region you are paying from and enter the amount you want to pay. Click "Next."
- "Select" your preferred payment method.
- Complete all fields. Check the box that you have read, understand and agree to the Flywire Terms of Use and Privacy Policy and click "Next."
- Complete the contact information. To pay the tuition bill, select Student account payment for Payment Type. When all fields are complete, click "Next."
- Review the information and click "Pay."
- Your payment is now pending. Print the page and follow the instructions to complete the payment process.
- Students log in to Buff Portal (buffportal.colorado.edu.) (Authorized payers log in to CUBill&Pay, select "View & Pay Accounts" and go to step 4 below.)
- Locate the Tuition & Fees card. It will be on the main Buff Portal page. Then click "Balance Summary."
- On the Balance Summary view, you can see your current balance. To see the bill, click "View/Pay Bill."
- You will see options for CU Boulder Tuition and Fees (Main Campus) and Continuing Education. Click the pay button for the campus you wish to pay. Pay each campus separately.
- Enter payment amount and choose a payment method. (A nonrefundable 2.85% service fee is assessed by NelNet Campus Commerce for all debit or credit transactions. We encourage payment from a checking or savings account (eCheck) in order to save money and avoid paying the service fee charged by NelNet. Paying with eCheck is secure, fast and free.)
- Click "Continue."
- Enter payment information and click "Continue."
- Review the information and click "Confirm" to make your payment.
- If you paid with a credit or debit card, you will see two receipts: one for payment of tuition and fees to CU Boulder; and one for the service fee to NelNet.
- Apply once in your lifetime at College Assist.
- When you’re finished applying, it will take 2–7 days before you can complete the next step (authorization of the stipend to your bursar account).
- Log in to Buff Portal (buffportal.colorado.edu).
- Search for "cof" or "college opportunity fund" in the Buff Portal search bar. Click "College Opportunity Fund (COF)."
- Click "View your COF status."
- Click "Authorize and click Submit."
- Click "Confirm." The stipend will appear on your student account in 24-48 hours.
- Activate your IdentiKey.
- Students log in to Buff Portal (buffportal.colorado.edu).
- Locate the Tuition & Fees card.
- Click "More Items."
- Click "Returning Student Confirmation Deposit."
- Click "Pay Deposit."
- Choose a payment method and click "Continue." (A nonrefundable 2.85% is assessed by NelNet Campus Commerce for all debit or credit transactions. We encourage payment from a checking or savings account (eCheck) in order to save money and avoid paying the service fee. ECheck is secure, fast and free.)
- Enter payment information and click "Continue."
- Confirm that the information is correct click "Confirm" to complete your payment.
Direct deposit for tuition and fees is separate from direct deposit for your paycheck.
- To set up direct deposit, you will need a U.S. checking or savings account in your name, your bank routing number and your account number. Credit, debit or Buff OneCard numbers are not routing numbers. Your bank routing number is a nine-digit code that identifies your bank. It can usually be found on your bank's website or you can call them directly.
- Log in to Buff Portal (buffportal.colorado.edu).
- Locate the Tuition & Fees card. It will be on the main Buff Portal page. Then click "Account Setup."
- Click "Direct Deposit."
- Read the authorization and disclosure, and then click "Next."
- Enter your banking information and click "Next."
- Confirm the information and click "Submit." If your banking information changes, you'll need to update this information.
- Next you will see a confirmation page. When you see a credit on your tuition account and you have set up direct deposit, refunds will be deposited into your bank account in 2-3 business days, depending on your bank.
Please see Health and Wellness Services for instructions.
Please visit Activate My IdentiKey.
- Students log in to Buff Portal (buffportal.colorado.edu.) (Authorized payers log in to CUBill&Pay, select "Payment Plan" and go to step 4 below.)
- Locate the Tuition & Fees card. It will be on the main Buff Portal page. Then click "Balance Summary."
- Click "View Payment Plans."
- Choose a plan and click "Sign Up for New Payment Plan."
- Amounts the Budget Worksheet may be filled in with actual amounts from your tuition bill. If not, you can enter an estimate for planning purposes and the payment plan will be adjusted later when your actual bill is calculated. See Tuition & Fee Rate Sheets for help entering amounts. Click "Continue."
- Choose a payment plan. Then choose a security question and fill in the answer. Then choose a payment method and click "Continue."(A nonrefundable 2.85% service fee is assessed by NelNet Campus Commerce for all debit or credit transactions. We encourage payment from a checking or savings account (eCheck) in order to save money and avoid paying the service fee charged by NelNet. Paying with eCheck is secure, fast and free.)
- Enter payment information and click "Continue."
- Confirm that the information is correct, note the estimated installment amount and click "Continue."
- Read the Payment Plan Terms and Conditions. We recommend printing the Terms and Conditions so you can refer to them later. Check the box to accept the terms and click "Confirm" to activate the agreement.
This task can be completed by the payment plan owner. If you don't see all of these options when you log in, then you are not the plan owner.
- Students log in to Buff Portal (buffportal.colorado.edu.) (Authorized payers log in to CUBill&Pay, select "Payment Plan" and go to step 4 below.)
- Locate the Tuition & Fees card. It will be on the main Buff Portal page. Then click "Balance Summary."
- Click "View Payment Plans."
- On View & Pay Accounts, click "Adjust Balance."
- On Payment Plan Details, click "Balance Management."
- Select Rebalance Payments Evenly and then click "Rebalance Payments."
- Review the new details of your payment plan and note the updated installment amounts.
- Students log in to Buff Portal (buffportal.colorado.edu.) (Authorized payers log in to CUBill&Pay and go to step 4 below.)
- Locate the Tuition & Fees card. It will be on the main Buff Portal page. Then click "Balance Summary" and "View/Pay Bill."
- Select "Payment Profiles" and then click on the profile you want to edit. To create a profile, click "Add Credit/Debit Card Profile" or "Add eCheck Profile."
- To add or edit a profile, enter new information and click "Save."
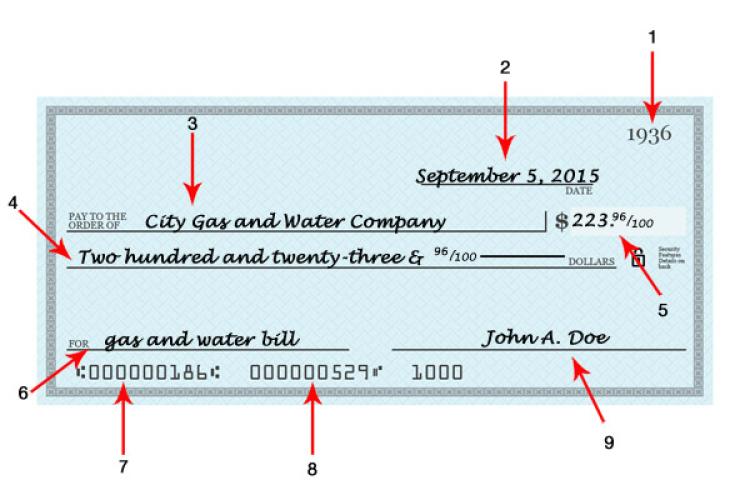
- Check number.
- Date the check is written. Write out the month, date, and year as shown above.
- Pay to the order of: this is where you write the name of the person, company, or business that you are paying.
- Write the amount of the check in words, as shown above. This is very important; the check may be returned if not written correctly.
- The amount of the check written in numbers. The amount must match the written words on line 4.
- This line is the “memo” line where you can write what the check is for, examples: rent, tuition bill, textbooks.
- Bank routing number.
- Your checking account number.
- Your signature.